Describe a Zone
Reading time: 9 minA zone is a conceptual framework defined by a set of rules, within which the recognized digital resources are compatible with these rules, taking into account the associated consents. A resource is not attached to a zone. The recognition of resources within a Zone relies on the dynamic evaluation of the conformity of the rules and consents of the resources.
All the workflows initiated within the Axone protocol must be defined in the context of a specific Zone. When the workflow is submitted, the protocol will check if all rules of the zone and of the engaged resources are respected and will apply the business model of the zone.
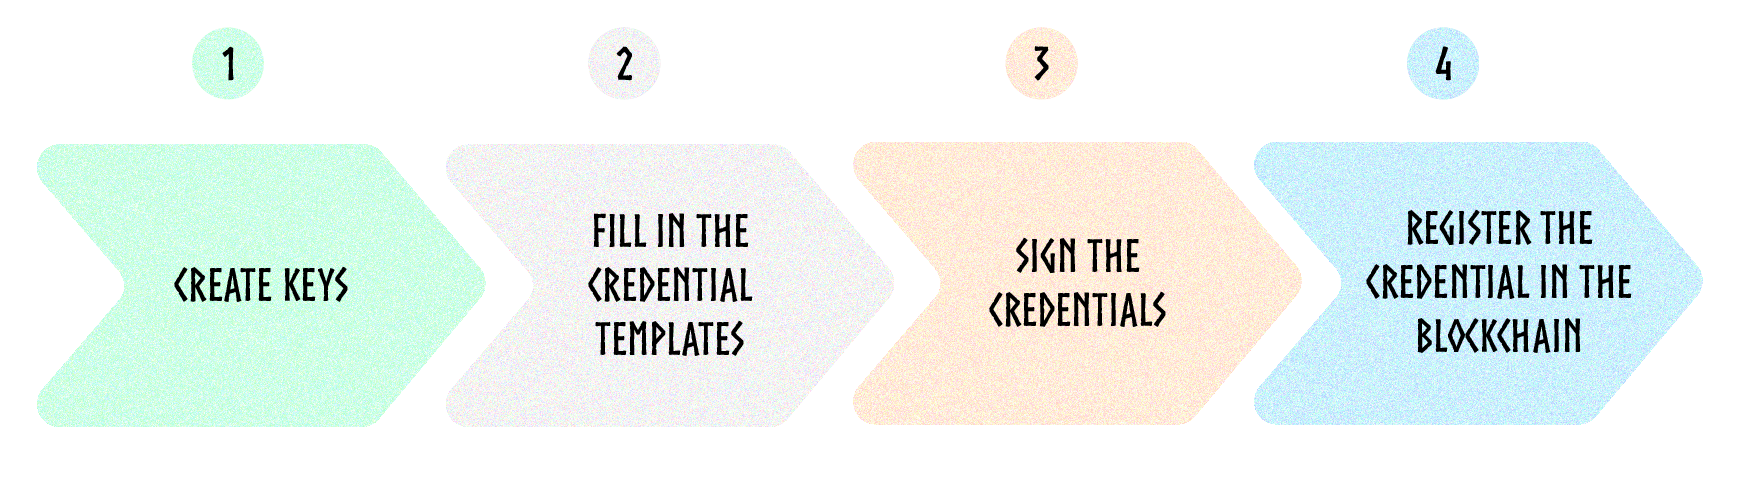
Let's see how to describe and register a zone in the Axone Protocol. Here are the four steps involved:
We'll take the example of the Collaborative AI Zone in this tutorial.
Prerequisite:
- Install the Axone CLI to interact with the protocol
- Ensure you have
npminstalled on your system. You can follow the installation guide here. - Install the json-cli with the following command:
npm install -g jsonld-cli
Step 1: Create keys
The first step consists of creating keys and related DID for the issuer of the credentials and the resource itself.
The Axone Protocol can provide you keys (also called a wallet) and DID. A key pair is created to obtain a wallet to establish secure ownership and control over your assets on the Axone blockchain. The key pair consists of two cryptographic keys: public and private keys. When creating a wallet, you're typically provided with a mnemonic consisting of 12, 24, or sometimes more words. This mnemonic acts as a human-readable representation of the underlying cryptographic information. It is easier to remember and write down than the complex numbers and characters representing the private key. The mnemonic serves as a backup mechanism for the wallet. You can regenerate the key pair by inputting the mnemonic into any compatible wallet software to recover access to your funds.
Here, we don't create a wallet for cryptocurrency storage but for secure storage of identifiers: A wallet can securely store digital identifiers, such as proofs of identity, certificates, or other personal identification information.
A keyring is a secure software utility designed to store and manage credentials, such as passwords, cryptographic keys, and API tokens, in a centralized and encrypted form. The --keyring-backend test command parameter is intended for use in testing environments. However, it is not recommended for production applications where the security of private keys is a highest priority.
For secure keyring setup in production environments, refer to the Cosmos SDK doc. This documentation provides a comprehensive guide to establishing a secure keyring configuration suitable for production use.
Avoid using the --keyring-backend test option in production, as it leaves private keys unencrypted on the file system, posing a potential security risk.
# Create a new key. Replace "collab-ai-zone" with another name
okp4d keys add collab-ai-zone --keyring-backend test
If you create a new key pair, the terminal displays a list of 24 words. Store this mnemonic phrase in a safe place.
Get the list of all your keys stored locally especially the new one. You can see that the DID related to this key is did:key:zQ3shunN7us5oKNYKKzprW8nP5HAoTf4t2Fxyudho5zMAR1PQ.
okp4d keys list --keyring-backend test

- address: okp41e48vdzvv5j337f6z5h93lyg5jth9ckn94cagzt
  did: did:key:zQ3shunN7us5oKNYKKzprW8nP5HAoTf4t2Fxyudho5zMAR1PQ
  name: collab-ai-zone
  pubkey: '{"@type":"/cosmos.crypto.secp256k1.PubKey","key":"A+D85xM279HkiCCqONveag2X4QLKA0cyliClJbsS2fsj"}'
  type: local
You can also use the command okp4d show to directly find information about a particular wallet.
# Replace "collab-ai-zone" with your wallet name
okp4d keys show collab-ai-zone --keyring-backend test

- address: okp41e48vdzvv5j337f6z5h93lyg5jth9ckn94cagzt
  name: collab-ai-zone
  pubkey: '{"@type":"/cosmos.crypto.secp256k1.PubKey","key":"A+D85xM279HkiCCqONveag2X4QLKA0cyliClJbsS2fsj"}'
  type: local
Reiterate the command to create a wallet to store the identity of the issuer.
So now we have the following information:
| Collaborative AI zone | |
|---|---|
| Name of the wallet | collab-ai-zone |
| Public key | okp41e48vdzvv5j337f6z5h93lyg5jth9ckn94cagzt |
| DID | did:key:zQ3shunN7us5oKNYKKzprW8nP5HAoTf4t2Fxyudho5zMAR1PQ |
| Issuer | |
|---|---|
| Name of the wallet | issuer-okp4 |
| Public key | okp41ysl9yllv40kfygcdfqj7c9n2a5c5zpmgku8ufg |
| DID | did:key:zQ3shs7auhJSmVJpiUbQWco6bxxEhSqWnVEPvaBHBRvBKw6Q3 |
In the future, you will be able to use any key provider, such as Cheqd.
Step 2: Create the credentials
Find the credential templates you need in the Ontology documentation according to the nature of the resource you describe.
For the zone, instantiate the template credential-zone-description.
Would you like to describe your zone with other properties? You can create your template of credentials. Don't directly add these properties in the ZoneDescriptionCredential as defined in the Ontology.
Description of the Zone
Here are the following metadata of the zone Collaborative AI Zone
| Title | Collaborative AI Zone |
|---|---|
| Description | Collaborative AI Zone is dedicated to training AI models in a collaborative and open way. |
| Image | NA |
| Tags | AI, Collaboration, Machine learning |
| Topic | Other |
Let's fill in the template.
{
    "@context": [
        "https://www.w3.org/2018/credentials/v1",
        "https://w3id.org/okp4/ontology/v3/schema/credential/zone/description/"
    ],
    "type": ["VerifiableCredential","ZoneDescriptionCredential"],
    "id": "https://w3id.org/okp4/ontology/v3/schema/credential/zone/description/7f547e63-ceb8-4ff3-8e2e-7a4278d97b8e",
    "credentialSubject": {
        "id": "did:key:zQ3shunN7us5oKNYKKzprW8nP5HAoTf4t2Fxyudho5zMAR1PQ",
        "hasDescription": "Collaborative AI Zone is dedicated to train AI models in a collaborative and open way.",
        "hasTag": [
            "AI",
            "Collaboration",
            "Machine Learning"
        ],
        "hasTitle": "Collaborative AI Zone",
        "hasTopic": "https://w3id.org/okp4/ontology/v3/thesaurus/topic/other"
    },
    "issuanceDate": "2024-02-02T15:40:43.475304+01:00",
    "issuer": {
        "id": "did:key:zQ3shs7auhJSmVJpiUbQWco6bxxEhSqWnVEPvaBHBRvBKw6Q3",
        "name": "OKP4"
    }
}
Fields to modify:
id(in @context): change the UUID at the end of the URI. You can generate a new UUID with this tool.id: copy the did:key of the zonehasDescription: fill in the description of the zonehasTag: fill in a list of tagshasTitle: fill in the title of the zonehasTopic: select the topic concerned by your zone in the Thesaurus Topic. Put the URI of the selected topic in the jsonld.issuanceDate: update the date for Todayid(issuer): copy the did:key of the issuername: put the issuer's name (string).
You can remove some properties if they are not relevant to your zone.
Step 3: Sign the credentials
Now that you have created the VC, you will sign it.
Signing a verifiable credential involves creating a digital signature using cryptographic techniques. This signature is unique to both the document (in this case, the credential) and the signer's private key, making it nearly impossible to forge. The private key is kept secret by the signer, while the corresponding public key is made available for anyone wishing to verify the signature's authenticity.
By signing the credential, any alteration to the credential's data after it has been signed will invalidate the signature. This ensures the data has not been tampered with and remains as it was when issued.
To sign your VC, use this command:
okp4d credential sign $/MY-DIRECTORY/MY-DATASET.jsonld
    --keyring-backend test
    --from $MY_ADDR | jsonld toRdf -q - > $MY-DATASET.nq
With:
/MY-DIRECTORY/MY-DATASET.jsonld: credential file addressMY_ADDR: issuer addressMY-DATASET.nq: name of the file with the signed credential in RDF format
Example:
okp4d credential sign collab-ai-zone-description.jsonld
    --keyring-backend test
    --from issuer-okp4 | jsonld toRdf -q - > collab-ai-zone-description.nq
You can see that there is new fields in the jsonld with the cryptographic proof.
<did:key:zQ3shunN7us5oKNYKKzprW8nP5HAoTf4t2Fxyudho5zMAR1PQ> <https://w3id.org/okp4/ontology/v3/schema/credential/zone/description/hasDescription> "Collaborative AI Zone is dedicated to train AI models in a collaborative and open way." .
<did:key:zQ3shunN7us5oKNYKKzprW8nP5HAoTf4t2Fxyudho5zMAR1PQ> <https://w3id.org/okp4/ontology/v3/schema/credential/zone/description/hasTag> "AI" .
<did:key:zQ3shunN7us5oKNYKKzprW8nP5HAoTf4t2Fxyudho5zMAR1PQ> <https://w3id.org/okp4/ontology/v3/schema/credential/zone/description/hasTag> "Collaboration" .
<did:key:zQ3shunN7us5oKNYKKzprW8nP5HAoTf4t2Fxyudho5zMAR1PQ> <https://w3id.org/okp4/ontology/v3/schema/credential/zone/description/hasTag> "Machine Learning" .
<did:key:zQ3shunN7us5oKNYKKzprW8nP5HAoTf4t2Fxyudho5zMAR1PQ> <https://w3id.org/okp4/ontology/v3/schema/credential/zone/description/hasTitle> "Collaborative AI Zone" .
<did:key:zQ3shunN7us5oKNYKKzprW8nP5HAoTf4t2Fxyudho5zMAR1PQ> <https://w3id.org/okp4/ontology/v3/schema/credential/zone/description/hasTopic> <https://w3id.org/okp4/ontology/v3/thesaurus/topic/other> .
<https://w3id.org/okp4/ontology/v3/schema/credential/zone/description/7f547e63-ceb8-4ff3-8e2e-7a4278d97b8e> <http://www.w3.org/1999/02/22-rdf-syntax-ns#type> <https://w3id.org/okp4/ontology/v3/schema/credential/zone/description/ZoneDescriptionCredential> .
<https://w3id.org/okp4/ontology/v3/schema/credential/zone/description/7f547e63-ceb8-4ff3-8e2e-7a4278d97b8e> <http://www.w3.org/1999/02/22-rdf-syntax-ns#type> <https://www.w3.org/2018/credentials#VerifiableCredential> .
<https://w3id.org/okp4/ontology/v3/schema/credential/zone/description/7f547e63-ceb8-4ff3-8e2e-7a4278d97b8e> <https://w3id.org/security#proof> _:b0 .
<https://w3id.org/okp4/ontology/v3/schema/credential/zone/description/7f547e63-ceb8-4ff3-8e2e-7a4278d97b8e> <https://www.w3.org/2018/credentials#credentialSubject> <did:key:zQ3shunN7us5oKNYKKzprW8nP5HAoTf4t2Fxyudho5zMAR1PQ> .
<https://w3id.org/okp4/ontology/v3/schema/credential/zone/description/7f547e63-ceb8-4ff3-8e2e-7a4278d97b8e> <https://www.w3.org/2018/credentials#issuanceDate> "2024-02-02T15:40:43.475304+01:00"^^<http://www.w3.org/2001/XMLSchema#dateTime> .
<https://w3id.org/okp4/ontology/v3/schema/credential/zone/description/7f547e63-ceb8-4ff3-8e2e-7a4278d97b8e> <https://www.w3.org/2018/credentials#issuer> <did:key:zQ3shs7auhJSmVJpiUbQWco6bxxEhSqWnVEPvaBHBRvBKw6Q3> .
_:b1 <http://purl.org/dc/terms/created> "2024-04-03T09:30:58.82844+02:00"^^<http://www.w3.org/2001/XMLSchema#dateTime> _:b0 .
_:b1 <http://www.w3.org/1999/02/22-rdf-syntax-ns#type> <https://w3id.org/security#EcdsaSecp256k1Signature2019> _:b0 .
_:b1 <https://w3id.org/security#jws> "eyJhbGciOiJ1bmtub3duIiwiYjY0IjpmYWxzZSwiY3JpdCI6WyJiNjQiXX0..-oJCy6SuZM1QmQNOw2_cpdXfqSu3sER_V-j1FfcE-k1pjh-K4TFtNc4EMuHcoTp-FMsCcJoMyR3xphLPo0BLgQ" _:b0 .
_:b1 <https://w3id.org/security#proofPurpose> <https://w3id.org/security#assertionMethod> _:b0 .
_:b1 <https://w3id.org/security#verificationMethod> <did:key:zQ3shs7auhJSmVJpiUbQWco6bxxEhSqWnVEPvaBHBRvBKw6Q3#zQ3shs7auhJSmVJpiUbQWco6bxxEhSqWnVEPvaBHBRvBKw6Q3> _:b0 .
The VC is now in the hands of the Holder. Note that it is possible that the Issuer is also the Holder.
The Axone blockchain can only register VCs in N-Quads format.
Step 4: Register the credentials in the blockchain
The final step is to register the VCs in the Axone blockchain by submitting them to the Dataverse smart contract. It's the role of the Registrant (who can be the Holder or another entity).
Note that as you interact with the Axone blockchain, you must pay fees in $AXONE at each transaction.
okp4d tx wasm execute $CONTRACT_ADDR \
    --node "https://api.drunemeton.okp4.network:443/rpc" \
    --chain-id okp4-drunemeton-1 \
    --from $MY_ADDR \
    --keyring-backend test
    --gas 10000000 \ "{\"submit_claims\":{\"metadata\": \"$(cat $MY-DATASET.nq | base64)\"}}"
With:
CONTRACT_ADDR: dataverse contract address (always the same) - For the Drunemeton testnet use okp418cszlvm6pze0x9sz32qnjq4vtd45xehqs8dq7cwy8yhq35wfnn3qvya8dunode "https://api.drunemeton.okp4.network:443/rpc": name of the node for the Drunemeton testnetMY_ADDR: registrant okp4 address$MY-DATASET.nq: name of the file with the signed credential in RDF format
Example:
okp4d tx wasm execute okp418cszlvm6pze0x9sz32qnjq4vtd45xehqs8dq7cwy8yhq35wfnn3qvya8du \
    --node "https://api.drunemeton.okp4.network:443/rpc" \
    --chain-id okp4-drunemeton-1 \
    --from issuer-okp4 \
    --keyring-backend test
    --gas 10000000 "{\"submit_claims\":{\"metadata\": \"$(cat collab-ai-zone-description.nq | base64)\"}}"
The Protocol will check the signature and if the public key corresponds to the proof in the VC, the VC is registered in the smart contract (Cognitarium).
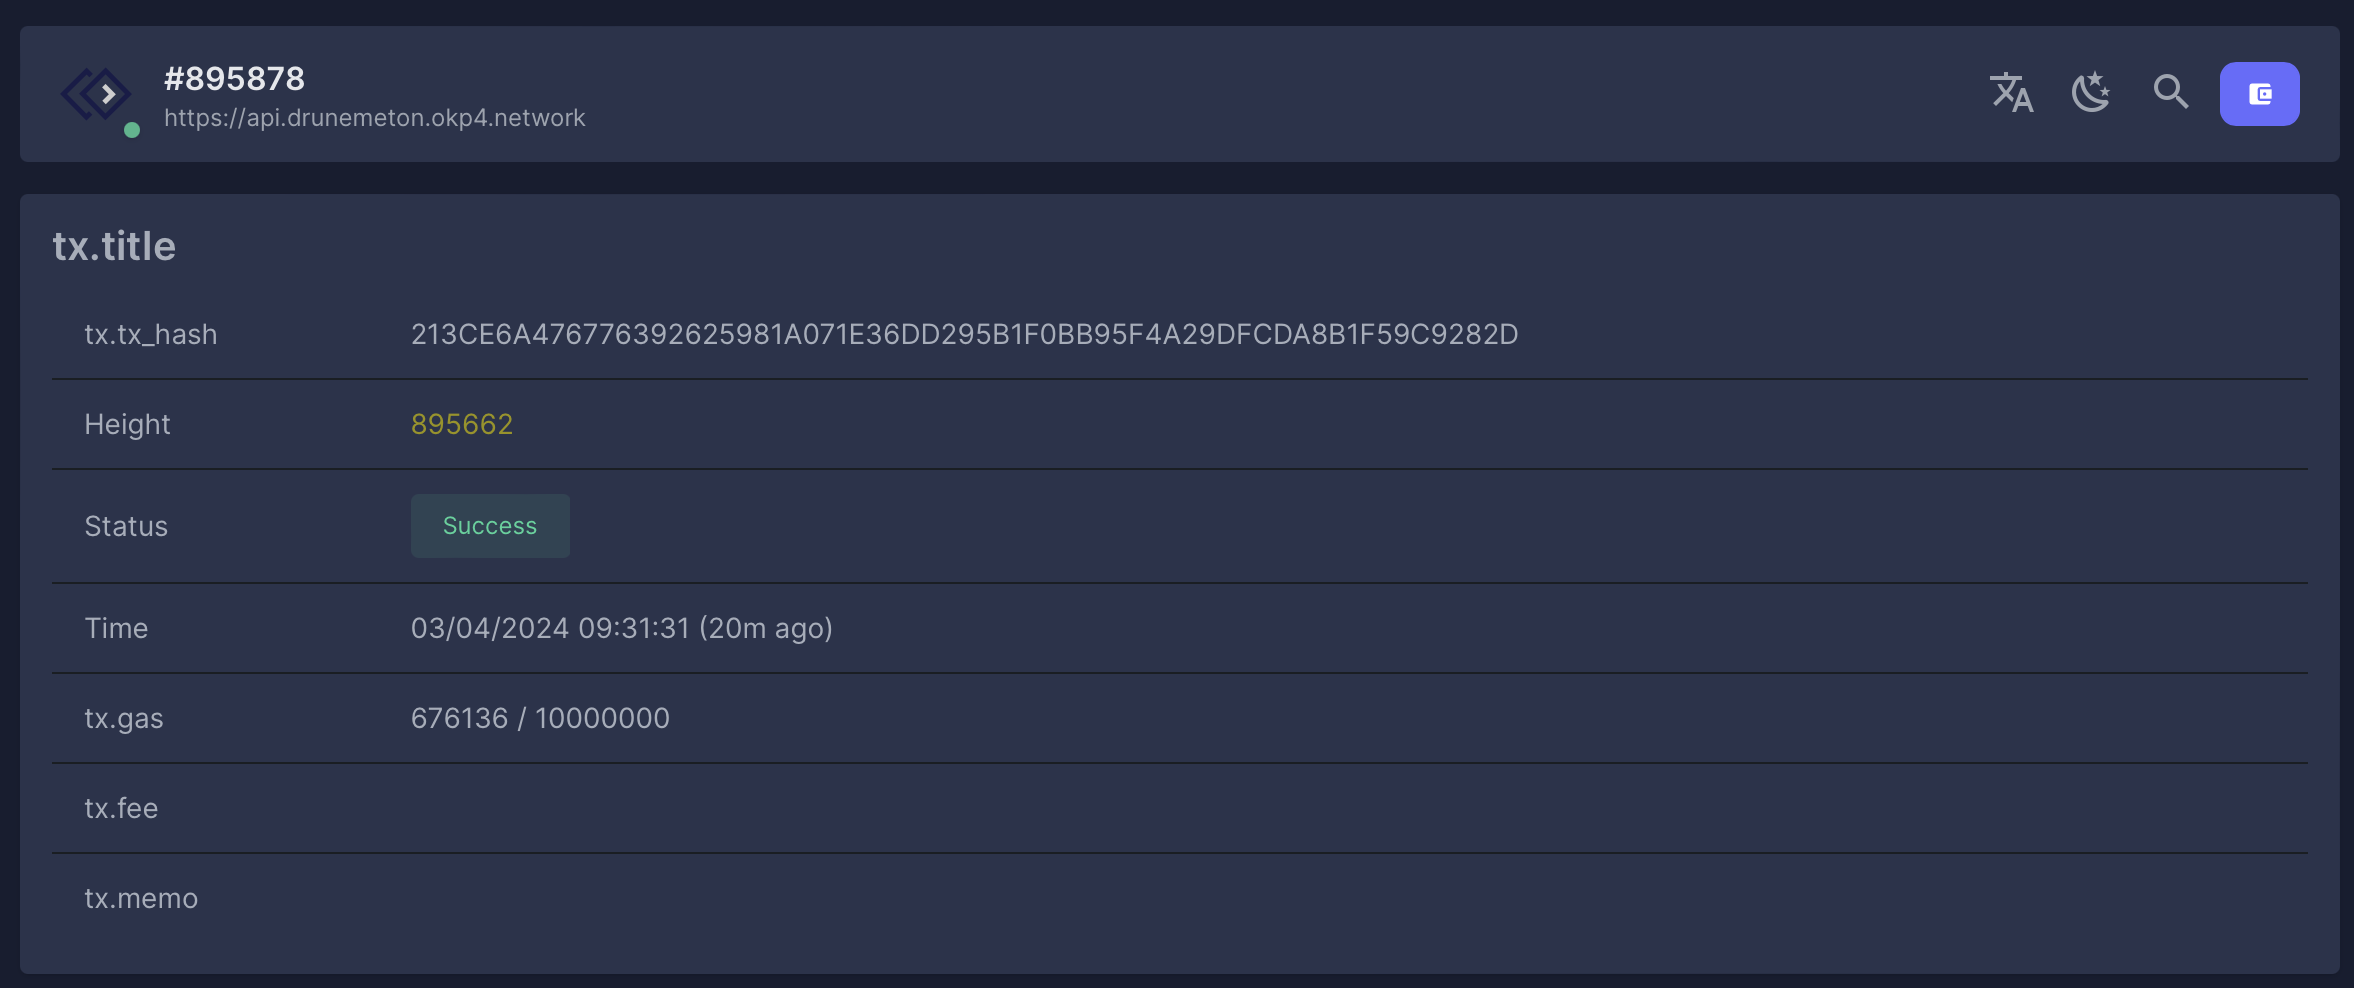
The command returns the hash of the transaction. You can find more details of this transaction in the Explorer. Select the network (Currently Drunemeton-Testnet), click on the Search icon, and paste the transaction hash.
Example: Hash: 213CE6A476776392625981A071E36DD295B1F0BB95F4A29DFCDA8B1F59C9282D
Remember, the Resource Governance VC ensures the existence of a resource in the protocol: a resource or zone exists in the protocol only if governance is attached to it. Let's do it on the next page.